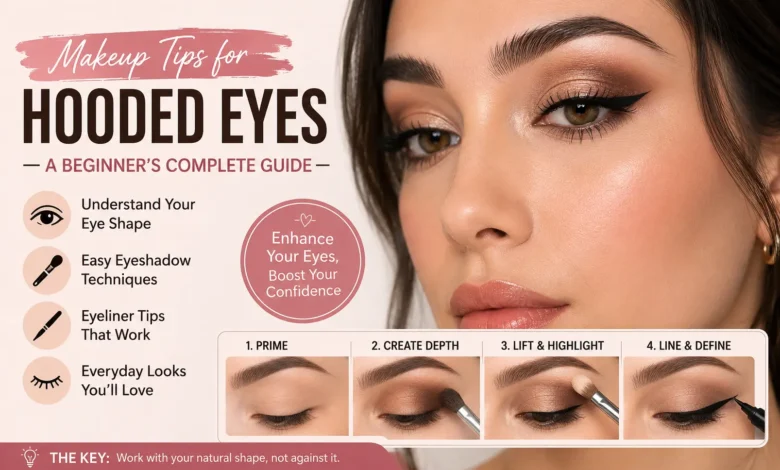
If you’ve ever followed a makeup tutorial step by step, only to end up with your eyeshadow completely disappearing the moment you open your eyes, there’s a good chance you have hooded eyes. It’s one of the most common eye shapes, and yet so much mainstream makeup advice is written with a different eye shape in mind — which can make hooded-eye makeup feel confusing, frustrating, or even impossible as a beginner.
Here’s the good news: hooded eyes are not harder to work with, they just need a slightly different approach. Once you understand a few key techniques, applying eyeshadow and eyeliner on hooded eyes becomes just as simple (and honestly, often more forgiving) than other eye shapes. This guide walks you through everything — what hooded eyes actually are, how to figure out if you have them, and step-by-step techniques for eyeshadow, eyeliner, and full everyday looks.
What Are Hooded Eyes?
Hooded eyes are an eye shape where a fold of skin from the brow bone extends down and covers part or all of the visible eyelid, particularly when your eyes are open. This means less of your eyelid (“mobile lid”) is visible compared to other eye shapes, and eyeshadow applied in the crease can become hidden once your eyes are open rather than staying visible.
This isn’t the same as having smaller eyes or less eyelid skin overall — it’s simply about how much of that skin is visible due to the brow bone’s structure. Hooded eyes can appear on people of any age, though the hooding can sometimes become slightly more pronounced over time as skin naturally loses some elasticity.
It’s also worth noting that hooded eyes are incredibly common and appear across every ethnicity and eye color, so if you have them, you’re in very good company — plenty of celebrities and makeup artists have hooded eyes too, which is part of why so many techniques exist specifically to work with this shape.
Do I Have Hooded Eyes? How to Tell
If you’re not sure whether your eye shape is hooded, here are a few simple ways to check:
- Look straight ahead in a mirror with your eyes fully open. If you can barely see any eyelid skin above your lash line (or none at all), you likely have hooded eyes.
- Check your crease. If your natural crease isn’t visible when your eyes are open — even though you can feel it when you close your eyes — this is a strong indicator of hooding.
- Look at old eyeshadow application. If eyeshadow you’ve applied in the crease seems to “vanish” the moment you open your eyes, that’s a classic sign of a hooded eye shape.
- Consider your brow bone. Hooded eyes often (though not always) come with a slightly more prominent brow bone, which is part of what causes the skin to fold downward over the lid.
If none of these apply to you, you may have a different eye shape, such as monolid, deep-set, or a more “standard” almond shape with a clearly visible crease — all of which have their own best practices, but this guide is focused specifically on hooded eyes.
Also Read: Beauty Tips and Routines: The Complete Guide to Skincare, Makeup, and Self-Care
Hooded Eyes vs. Normal Eyes: What’s the Difference?
Understanding hooded eyes vs. normal (or more accurately, “non-hooded”) eyes comes down to how much eyelid skin is visible when your eyes are open.
- Non-hooded eyes typically show a clearly visible crease and a good amount of eyelid skin between the lash line and the brow bone, even with eyes fully open.
- Hooded eyes have some or all of that eyelid skin covered by the fold coming down from the brow bone, which reduces the visible “canvas” for eyeshadow.
This distinction matters because a lot of standard eyeshadow tutorials assume you have plenty of visible lid space to work with. When you have hooded eyes, techniques need to be adjusted so that color placed in the crease doesn’t disappear, and so the eye still looks lifted and open rather than smaller or more closed-off.
Hooded Eyes vs. Non-Hooded Eyes vs. Other Shapes
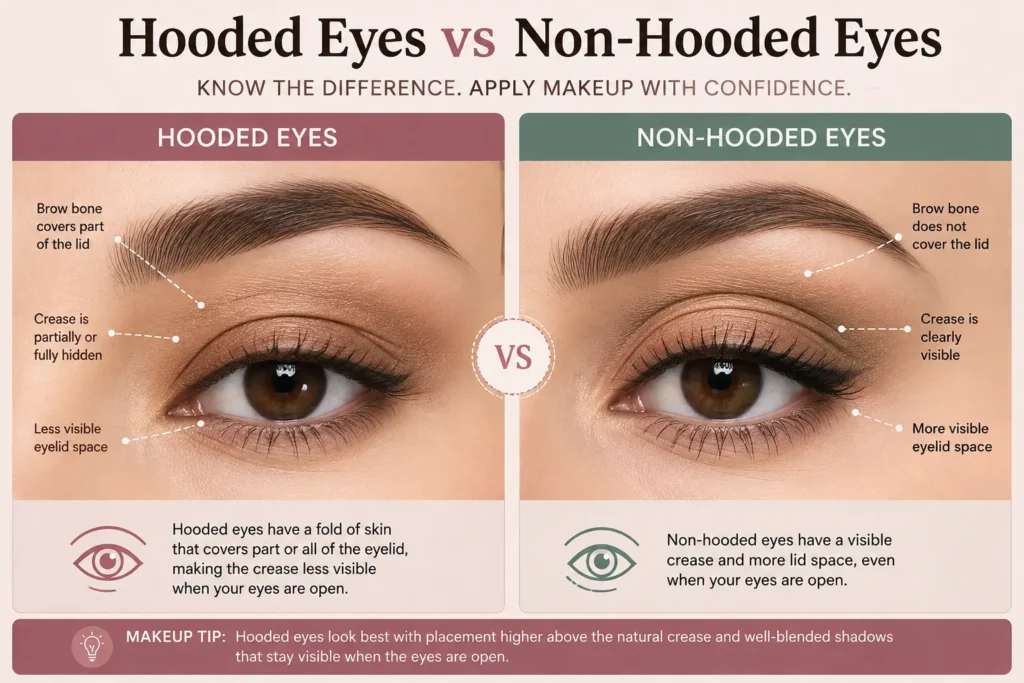
It’s easy to confuse hooded eyes with a few other related eye shapes, so here’s a quick breakdown:
| Eye Shape | Key Feature | Makeup Consideration |
|---|---|---|
| Hooded eyes | Brow bone skin covers part of the lid when eyes are open | Crease color needs to be placed higher and blended carefully |
| Non-hooded / standard eyes | Crease and lid space clearly visible | Most tutorials are written with this shape in mind |
| Monolid | Little to no visible crease at all, flatter lid | Focus is often on gradient blending across the whole lid |
| Deep-set eyes | Eyes sit further back in the socket, creating shadow | Lighter shades help bring the eye forward |
Hooded eyes and monolids are sometimes confused since both can appear to have less visible lid space, but they’re structurally different — monolids typically lack a distinct crease altogether, while hooded eyes usually have a crease, it’s just partially or fully covered by the brow bone skin.
Core Makeup Principles for Hooded Eyes
Before diving into specific techniques, a few foundational principles will make every other tip in this guide easier to apply:
- Apply eyeshadow with your eyes open, not just closed. Since hooded eyes hide crease color when open, checking your progress with your eyes open (or looking straight ahead in a mirror) helps you see exactly what will actually be visible.
- Focus color slightly above where you think the crease is. Because the hood covers part of the natural crease, placing color a little higher than expected helps it remain visible once your eyes are open.
- Avoid heavy shimmer directly on the lid, which can accentuate the hood rather than minimize it. Matte and satin finishes tend to be more flattering for definition.
- Keep blending soft rather than sharp. Hard shadow lines can look choppy on hooded eyes since the crease placement is less predictable than on non-hooded eyes.
- Use a primer. Hooded eyes often have slightly oilier lids due to more skin folding, which can cause eyeshadow to crease or fade faster without a primer as a base.
Eyeshadow for Hooded Eyes: Step-by-Step
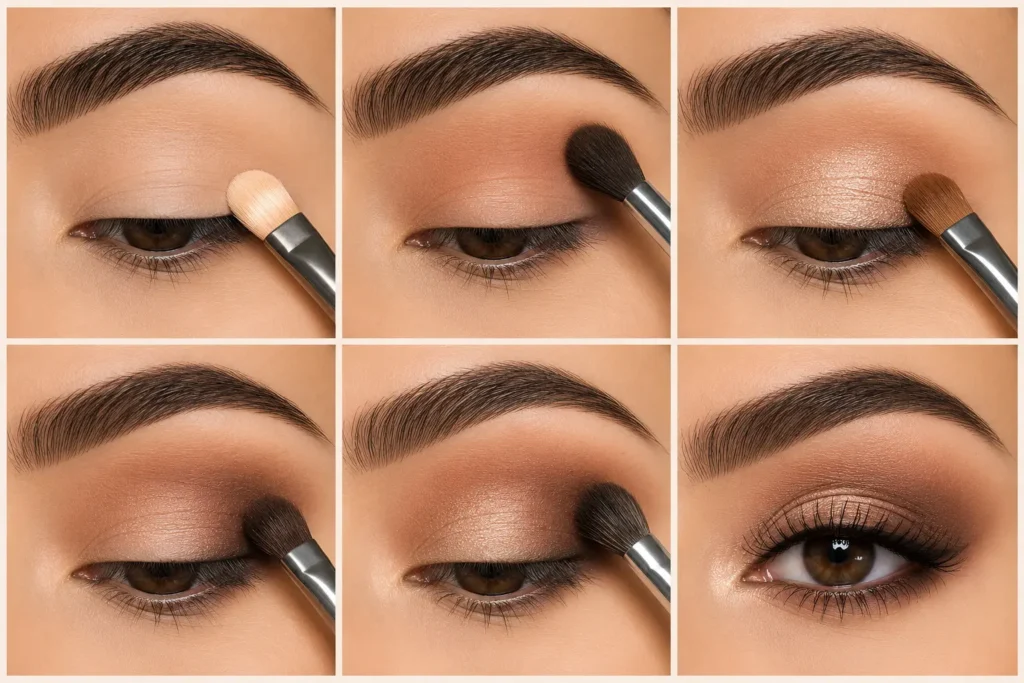
Getting eyeshadow to actually show up and stay visible is usually the biggest challenge for beginners with hooded eyes. Here’s a simple, beginner-friendly routine:
- Prime your lids. Apply a thin layer of eyeshadow primer across the entire lid, including the area under the hood, and let it set for a minute before applying color.
- Apply a transition shade. Using a fluffy blending brush, sweep a matte, slightly-darker-than-your-skin-tone shade through your crease area — but place it a little higher than where your visible crease sits, closer to your brow bone.
- Add a mid-tone shade to the lid. Apply a slightly deeper shade directly onto your mobile lid (the part of your eyelid you can see when your eyes are open), which helps create definition that remains visible.
- Deepen the outer corner. Using a small, dense brush, apply a darker shade to the outer corner in a soft “V” shape, blending upward and outward slightly to lift the eye visually.
- Blend, blend, and blend again. Hooded eyes benefit enormously from soft, diffused blending between shades, since harsh lines are more visible on this eye shape than on non-hooded eyes.
- Check with eyes open. Look straight ahead in the mirror periodically throughout the process to make sure your color placement is actually visible once your eyes are open, adjusting as needed.
- Highlight strategically. A touch of a light, shimmering shade on the brow bone (just under the eyebrow) and on the very center of the lid can help open up the eye and add dimension.
Eyeliner for Hooded Eyes: Getting It Right
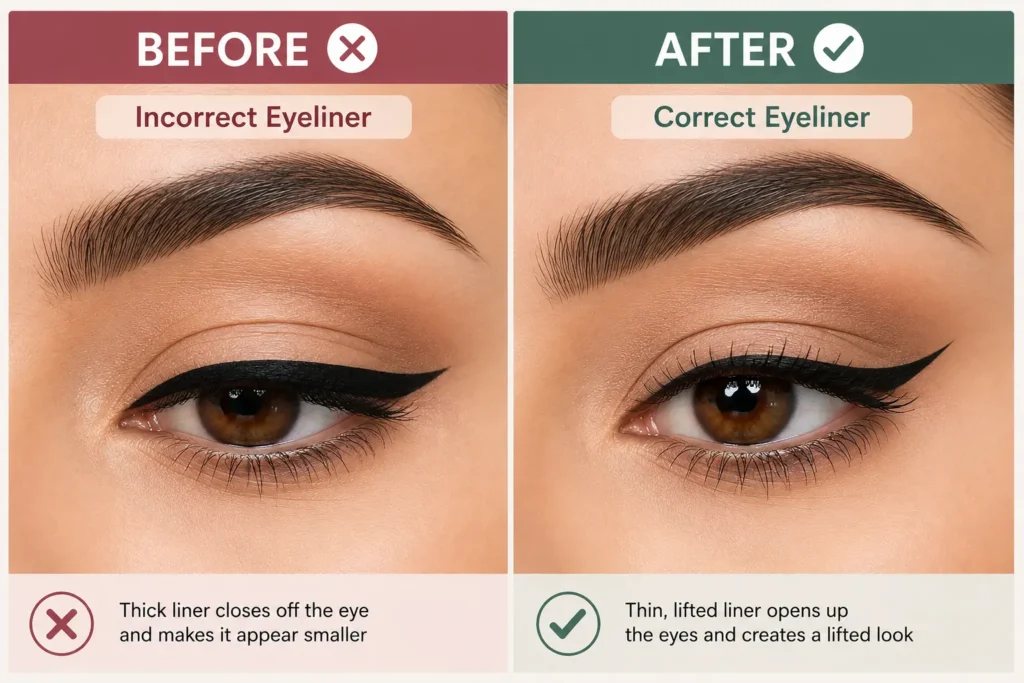
Eyeliner is another area where hooded eyes benefit from a slightly different approach than standard tutorials suggest.
Winged Eyeliner for Hooded Eyes
- Keep your eyes open while applying, or use small dots to map out your wing shape before committing to a full line — this helps prevent the wing from disappearing under the hood once your eyes are open.
- Angle your wing slightly upward, following the natural angle from your lower lash line toward the end of your eyebrow, which helps lift the eye rather than pull it downward.
- Keep the wing thinner rather than thicker. A bold, thick wing can get lost or look uneven under a hooded lid, while a thinner line tends to stay crisp and visible.
- Consider a slightly lifted, floating line. Rather than connecting the liner directly to your lash line at the outer corner, some hooded-eye makeup artists recommend a small gap between the liner and lash line at the outer corner, which can help create the illusion of a more open, lifted eye shape.
Everyday Eyeliner Tips
- A thin line along the upper lash line, tightlined into the roots of your lashes, adds definition without requiring a dramatic wing.
- Smudged, soft eyeliner (using a pencil rather than a sharp liquid liner) tends to look more forgiving and blends more naturally into a smokey eye look.
- Avoid thick liner across the entire lid, since this can visually shrink the already limited visible lid space on hooded eyes.
Simple Everyday Makeup for Hooded Eyes
For a quick, natural everyday look, you don’t need a full multi-shade eyeshadow routine. A simplified approach:
- Apply a neutral matte transition shade through the crease area, placed slightly higher than your visible crease.
- Add a light shimmer or satin shade to the center of the lid for subtle dimension.
- Tightline your upper lash line with a soft pencil liner for definition.
- Finish with a coat or two of mascara, focusing on the outer lashes to help lift and open the eye.
This kind of simple routine takes just a few minutes but still creates a polished, put-together look that photographs and holds up well throughout the day.
Smokey Eye for Hooded Eyes
A smokey eye might sound intimidating for beginners, but hooded eyes can actually handle this look beautifully once you know the adjusted technique:
- Apply your transition shade as usual, placed slightly higher than your natural crease.
- Instead of a single dark shade in the crease, gradually build up 2-3 progressively darker shades, blending each one thoroughly before adding the next.
- Keep the darkest shade concentrated on the outer corner and lower lash line rather than the entire lid, which helps avoid overwhelming the limited visible lid space.
- Smudge a soft pencil liner along both the upper and lower lash lines, blending with a small brush for a diffused, smoky finish.
- Finish with volumizing mascara and, if desired, a few individual false lashes concentrated at the outer corners for extra lift.
Mistakes to Avoid With Hooded Eyes Makeup
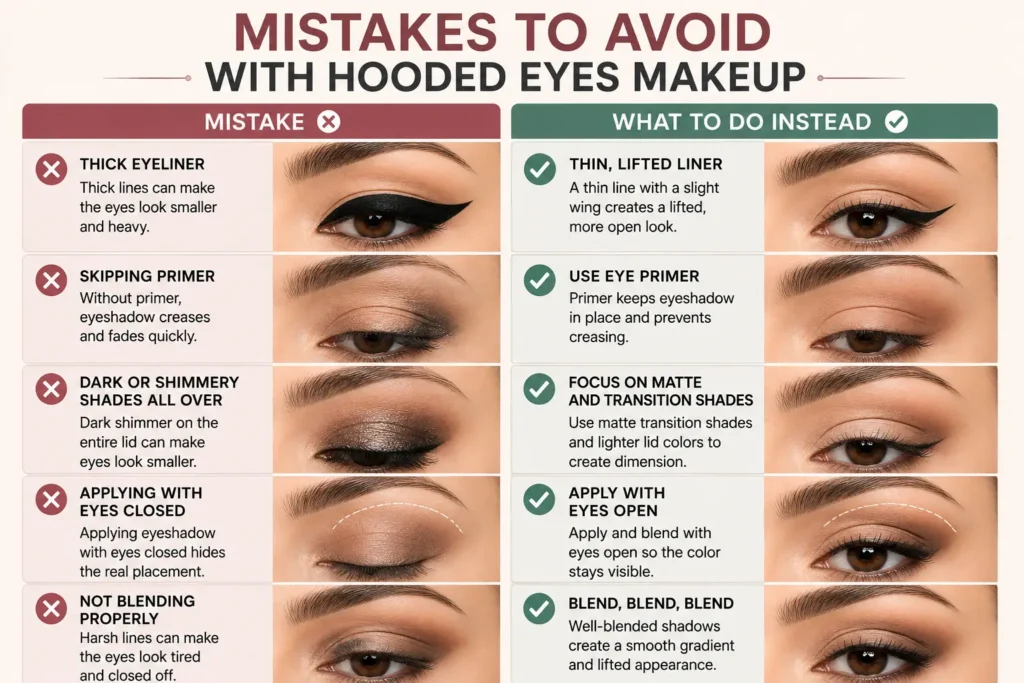
- Placing all your color in the crease only. Since the crease is partially hidden, relying solely on crease color often means most of your work becomes invisible once your eyes are open.
- Using only matte, flat shades with no dimension. While heavy shimmer can emphasize the hood, a complete absence of any light-reflecting shade can make the eye look flat rather than lifted.
- Applying eyeliner in one thick, unbroken line. This can visually close off the eye further — thinner, more strategic lines tend to be far more flattering.
- Skipping primer. Without it, eyeshadow is more likely to crease or fade into the fold throughout the day, which is more noticeable on hooded eyes than other shapes.
- Only checking your makeup with eyes closed. Since hooded eyes hide crease work once opened, this is one of the most common beginner mistakes — always check your progress with eyes open.
Best Products for Hooded Eyes
While personal preference always plays a role, a few product characteristics tend to work particularly well for hooded eyes:
- Long-wear eyeshadow primer: Helps prevent creasing in the fold and keeps color vibrant throughout the day.
- Matte and satin eyeshadow finishes: Generally more flattering for crease definition than heavy glitter or high-shine shimmer directly on the lid.
- Fine-tip liquid or gel eyeliner: Easier to control for thin, precise lines and winged shapes than a thick felt-tip pen.
- Smudge-friendly pencil eyeliner: Ideal for soft, diffused looks like everyday tightlining or smokey eyes.
- Lengthening or curling mascara: Helps visually lift and open the eye, which pairs especially well with hooded eye techniques.
- Small, dense blending brushes: Precision brushes make it much easier to control exactly where color sits, which matters more for hooded eyes than for shapes with more visible lid space.
Eyebrow Shaping and Hooded Eyes
Your eyebrows play a bigger role in how open your eyes appear than many beginners realize, especially with hooded eyes.
- Avoid over-plucking or thinning your brows too much, since a fuller, well-defined brow helps create structure that visually lifts the entire eye area.
- Keep the arch slightly higher rather than flat, which can help counteract some of the visual weight created by the hood.
- Fill in sparse areas with a brow pencil or powder that matches your natural color, focusing on creating a soft, natural arch rather than a harsh, drawn-on line.
- Consider a clear or tinted brow gel to keep hairs groomed upward and in place, which further supports the lifted look many hooded-eye techniques aim for.
Getting your brow shape right before applying eyeshadow can make a noticeable difference in how open and lifted your entire eye makeup looks, even before you add any color to the lid itself.
Choosing Eyeshadow Colors Based on Your Eye Color
While any eyeshadow shade can technically work with hooded eyes, certain color families tend to make your natural eye color stand out more:
- Brown eyes: Nearly universally flattering with almost any shade, though purples, blues, and warm golds tend to create particularly striking contrast.
- Blue eyes: Warm tones like copper, bronze, and terracotta help make blue eyes pop, since warm and cool tones create natural contrast.
- Green eyes: Reds, plums, and warm browns tend to enhance green eyes especially well, again through complementary color contrast.
- Hazel eyes: Because hazel often contains flecks of multiple colors, a wide range of shades can work — purples and greens in particular tend to bring out different tones within the eye.
These are general guidelines rather than strict rules, and experimenting with different color families is one of the best ways to discover what you personally like best, regardless of your natural eye color.
Essential Tools for Hooded Eyes Makeup
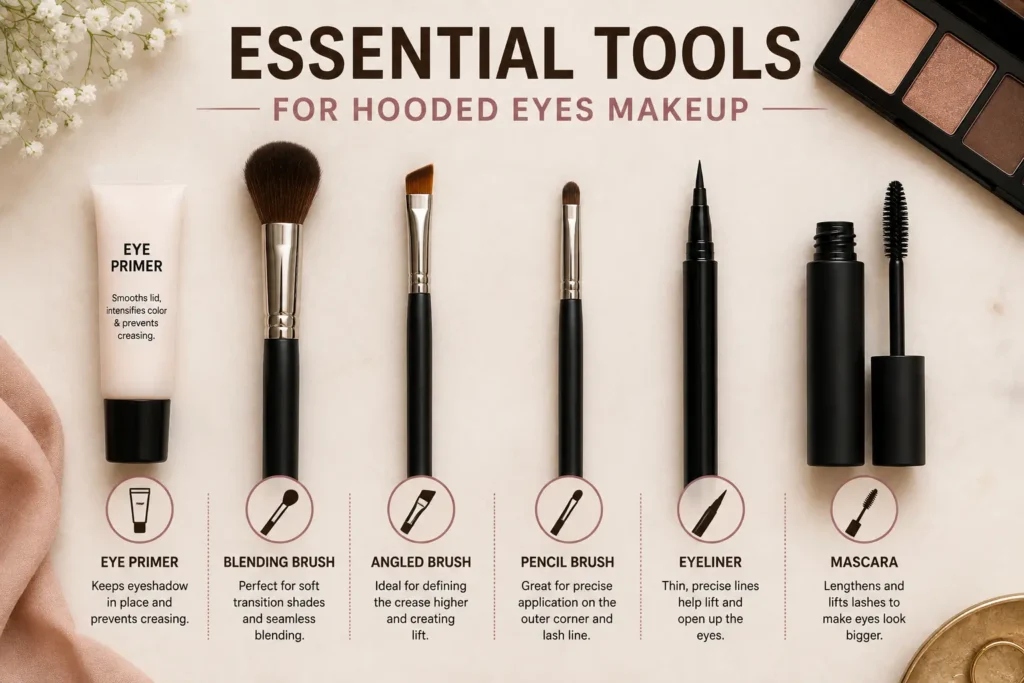
Having the right tools on hand makes the techniques in this guide significantly easier to execute, especially as a beginner:
- A fluffy blending brush: Used for softly diffusing your transition shade through the crease area without harsh lines.
- A small, dense shading brush: Ideal for packing color onto the lid and outer corner where more precise placement matters.
- An angled brush: Useful for both eyeliner application and filling in brows with precision.
- A pencil brush or small crease brush: Helps with detailed blending in the smaller, more limited space typical of hooded eyes.
- Cotton swabs: Handy for cleaning up small smudges or sharpening the edges of your eyeliner wing without redoing your entire eye.
Investing in a few good-quality brushes, even a small starter set, tends to make a much bigger difference in your results than investing heavily in eyeshadow palettes alone.
Makeup Tips for Hooded Eyes as You Get Older
Hooding can sometimes become slightly more pronounced with age due to natural changes in skin elasticity, and a few extra adjustments can help:
- Use long-wear, crease-resistant formulas, since eyeshadow can settle into fine lines more easily over time.
- Avoid heavy shimmer or glitter, which can draw more attention to texture rather than smoothing the overall look.
- Focus on lifting techniques, like the upward-angled wing and outer-corner emphasis described earlier, which help visually counteract any additional hooding.
- Keep brows well-groomed and slightly lifted, since well-shaped brows can significantly influence how open the entire eye area appears.
Hooded Eyes on Celebrities: You’re in Good Company
Hooded eyes are incredibly common among well-known public figures across the entertainment industry, which has helped normalize and popularize many of the techniques covered in this guide. Countless celebrated actresses, models, and beauty influencers have hooded eyes, and their red carpet and editorial looks are often used as inspiration precisely because their makeup artists have mastered the placement and blending techniques that work with this eye shape. If you’re looking for visual inspiration, searching for “hooded eye makeup” alongside a well-known celebrity name is a great way to find real-world examples of these techniques in action.
Building Confidence as a Beginner
Learning to work with hooded eyes takes a little practice, just like any new skill. A few tips to help you build confidence:
- Practice on days with no time pressure, so you can experiment with placement and blending without feeling rushed.
- Take photos of your finished look. Sometimes it’s easier to evaluate placement and blending in a photo than in a mirror, since photos can reveal areas that need more blending.
- Start with a simple two-shade look before attempting a full smokey eye, and build up your skills gradually.
- Don’t be discouraged by early attempts. Even experienced makeup artists had to learn these adjusted techniques at some point — hooded eyes simply require slightly different muscle memory than standard tutorials teach.
Frequently Asked Questions
What are hooded eyes exactly?
Hooded eyes are an eye shape where skin from the brow bone folds down and covers part or all of the visible eyelid when your eyes are open, which reduces the amount of visible lid space compared to non-hooded eyes.
How do I know if I have hooded eyes?
Look straight ahead in a mirror with your eyes fully open. If you can see little to no eyelid skin above your lash line, or if eyeshadow applied in your crease tends to disappear once your eyes are open, you likely have hooded eyes.
What’s the difference between hooded eyes and non-hooded eyes?
Non-hooded eyes typically show a clearly visible crease and eyelid skin even with eyes open, while hooded eyes have some or all of that space covered by a fold from the brow bone, requiring color to be placed slightly higher to remain visible.
What eyeshadow techniques work best for hooded eyes?
Placing your transition shade slightly above your visible crease, keeping the outer corner deepened in a soft “V” shape, and checking your progress with eyes open are among the most effective techniques for hooded eyes.
How should I apply eyeliner if I have hooded eyes?
Keep lines thinner rather than thick, angle any wing slightly upward, and check your look with eyes open before finalizing, since thick or downward-angled liner can make hooded eyes appear more closed off.
Can hooded eyes wear a smokey eye?
Yes. Building color gradually with 2-3 progressively darker shades, concentrating the darkest shade on the outer corner and lower lash line, and blending thoroughly all help create a smokey look that suits hooded eyes well.
Final Thoughts
Makeup for hooded eyes doesn’t have to be complicated once you understand the core adjustments: placing color slightly higher than your visible crease, checking your work with your eyes open, keeping blending soft, and favoring thinner, upward-angled eyeliner over thick, straight lines. With a bit of practice, these techniques become second nature, and you’ll likely find that hooded eyes offer just as much creative range as any other eye shape — if not more.
Give yourself room to practice, don’t be afraid to experiment with the techniques in this guide, and remember that even makeup artists who work with hooded eyes every day started exactly where you are now.
Also Read: Makeup Tips for Everyday Beauty: A Beginner’s Guide to Natural, Effortless Looks