

Igari makeup is a Japanese blush technique that places color under the eyes and across the bridge of the nose, so your face looks softly flushed, as if you just came in from the cold or had a little too much fun the night before. Done well, it looks youthful, fresh, and effortless. Done poorly, it can look patchy or like irritation.
This guide explains what Igari makeup is, where the blush goes, and 7 essential tips for a flawless result. You will also find a step-by-step tutorial, advice for different skin tones and face shapes, ideas for everyday and date night, and fixes for common problems.
What Is Igari Makeup?
Igari makeup is a Japanese makeup look known for blush placed directly under the eyes and swept across the bridge of the nose, creating a flushed, youthful finish. It is named after the Japanese makeup artist Shinobu Igari, who created the technique.
The look is also called hangover makeup or drunk blush, because it mimics the rosy flush that appears on your face after drinking or after a long night out. In Japanese, the look is linked to the word futsukayoi, which means hangover. Despite the nickname, the finish is meant to look soft and innocent rather than tired.
What Makes Igari Makeup Different?
Three things set Igari apart from most blush looks:
- Placement: the blush sits lower and closer to the eyes than a typical cheekbone application, and it extends across the nose.
- Softness: the color is blended into a diffuse flush, with no sharp edges.
- Minimal everything else: eye makeup, contour, and highlighter are kept light so the blush is the focus.
The technique has been written about by beauty media since at least 2018, and it continues to be popular on social media, which suggests it is more than a passing trend.
What Is Igari Blush?
Igari blush is the blush step of the look. It uses a soft pink, peach, or rose shade placed under the eyes, blended outward toward the temples, and lightly dusted across the nose.
How Igari Blush Compares With Other Blush Styles
| Style | Where the blush goes | The effect |
|---|---|---|
| Igari | Under the eyes and across the nose bridge | Flushed, youthful, soft-focus |
| Classic apples-of-the-cheeks | On the rounded part of the cheeks | Fresh, pinched-cheek look |
| Draping | Swept along the cheekbone toward the temples | Lifted, sculpted look |
| Korean-style blush | On or just below the cheekbone | Soft, sweet glow |
| Sunburn or nose blush | Across cheeks and nose in a warm shade | Sun-kissed, playful |
Placement varies by artist and tutorial, so treat these as general descriptions rather than strict rules.
7 Essential Tips for a Flawless Igari Blush Look
1. Start With Healthy, Hydrated Skin

Blush looks best on skin that is smooth and comfortable. Dry patches and flaky areas make color cling unevenly, especially under the eyes where skin is thin.
What to do:
- Cleanse and moisturize before you start.
- Apply sunscreen in the morning if this is a daytime look.
- Use a light base, such as a sheer foundation or skin tint, instead of a heavy full-coverage formula.
- Conceal only where you need it, such as around the nose or under the eyes. A natural finish helps the blush look like it comes from within.
2. Choose the Right Blush Formula
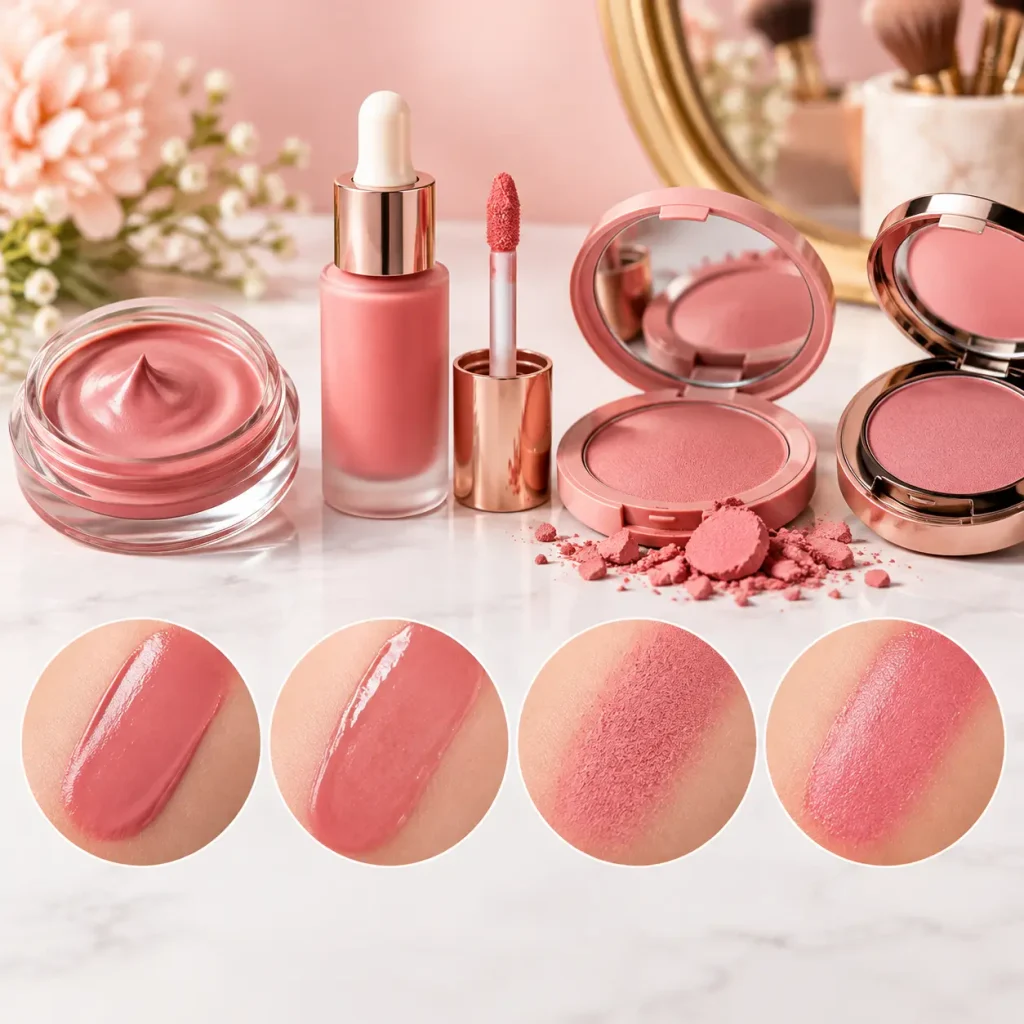
The formula changes how natural the look feels.
| Formula | Why it works for Igari | Watch out for |
|---|---|---|
| Cream blush | Melts into skin for a true flush | Can slide on very oily skin |
| Liquid blush | Very sheer and easy to build | Dries quickly, so blend fast |
| Powder blush | Easy to control, good for oily skin | Can look chalky on dry skin |
| Cream + powder | Longest wear and softest edges | Takes a bit more time |
If you are choosing between cream blush and powder blush for Igari makeup, start with cream or liquid for the base flush, then tap a powder in the same color family over the top to soften edges and help it last. This layering approach is commonly recommended by beauty editors.
3. Pick a Shade That Suits Your Skin Tone

Soft pink, peach, and rose are the classic Igari shades. The best choice depends on your skin tone and the effect you want.
| Skin tone | Shades to try | Tips |
|---|---|---|
| Fair | Soft pink, light rose, peachy pink | Start with a very light hand, since pale skin shows color quickly |
| Light to medium | Rose, coral-pink, warm peach | Easy to wear and flattering in most lighting |
| Medium to tan | Warm coral, terracotta-rose, deeper peach | Choose slightly more pigment so the color shows |
| Deep or brown | Berry, plum-rose, brick red, deep coral | Pick richly pigmented formulas so the color does not look ashy |
Igari makeup on dark skin and brown skin works well when you choose a shade with enough depth and pigment. Test the blush on your jawline or inner arm, build it in thin layers, and avoid very pale pinks that can look chalky. For lighter skin, deeper berry shades can look dramatic, so use a smaller amount.
4. Place the Blush Correctly

Where to place blush for Igari makeup is the most important detail.
Placement guide:
- Start just under the eyes, along the upper part of the cheek, close to but not touching the lower lash line.
- Extend the color outward toward the temples, keeping it soft.
- Sweep a little across the bridge of the nose so it connects both sides.
- Keep the lowest edge of the blush above the tip of your nose and above the mouth line so the flush stays on the mid-face.
This placement is what gives the face the flushed, “just came inside” look. If you are not sure, put on less than you think you need and add more after blending.
5. Blend Until There Are No Edges

A flawless Igari blush has no obvious borders. The color should fade out like watercolor.
How to blend blush for a flawless look:
- Use your fingers, a damp sponge, or a fluffy brush.
- Tap and press instead of dragging, which can move foundation.
- Blend outward toward the temples, then lightly across the nose.
- Add color in thin layers and build slowly.
- If you have a little blush left on your brush, sweep it across the nose to connect the pieces.
6. Keep the Rest of the Look Minimal
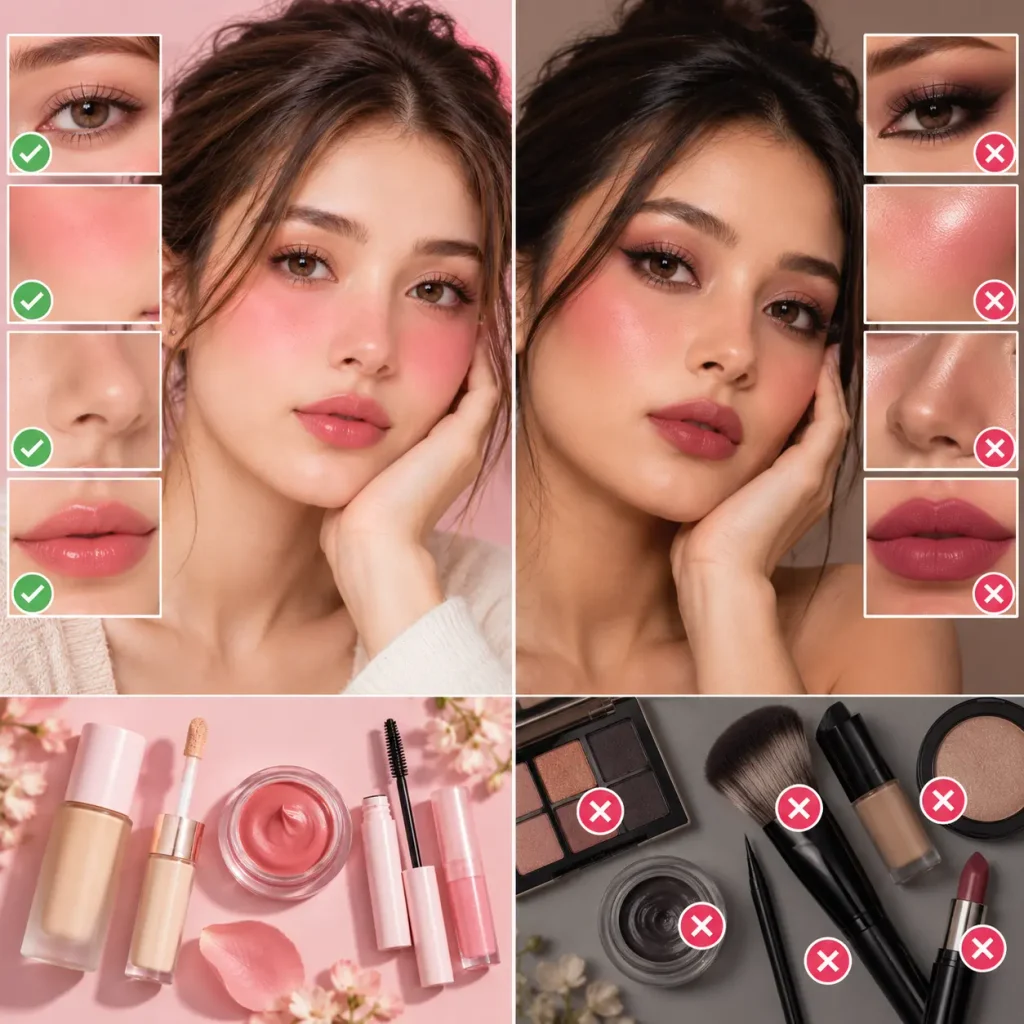
Igari makeup works because the blush is the star. Heavy contour, strong highlighter, and bold eye makeup can compete with it.
Pair it with:
- Soft, natural eyebrows
- A sheer wash of eyeshadow, light shimmer, or just mascara
- Glossy or tinted lips in pink, peach, or clear
- Minimal or no contour and highlighter
Beauty professionals often recommend skipping contour and highlighter on top of Igari blush, since the soft flush already adds dimension. If you like a little eye color, our eyeshadow palette guide has soft, neutral options that pair well with a flushed cheek.
7. Set It and Make It Last All Day

Igari makeup can fade or shift during the day, especially cream formulas. A few steps help.
How to make Igari makeup last all day:
- Set your T-zone lightly with translucent powder.
- Press a powder blush in the same color family over cream blush.
- Use a setting spray for extra staying power.
- Skip heavy moisturizers and oils right before applying.
- Carry the blush for quick touch-ups, tapping on a little more with your fingers.
Igari Makeup Tutorial: Step by Step
This step-by-step works for beginners.
- Prep your skin. Cleanse, moisturize, and apply sunscreen if it is daytime.
- Apply a light base. Use a skin tint or sheer foundation and conceal only where needed.
- Define your brows softly. Brush them up and fill in lightly.
- Add minimal eye makeup. Curl your lashes and apply mascara, or add a light wash of shadow.
- Apply cream or liquid blush. Dot a small amount under each eye and a little across the nose bridge.
- Blend. Tap and blend with your fingers or a sponge outward toward the temples and across the nose.
- Add more color if needed. Layer gradually until you reach the flush you want.
- Set lightly. Tap a powder blush in the same color family over the top and set the T-zone with translucent powder.
- Finish with lips. A tinted balm or gloss completes the look.
- Set with spray if you want it to last.
How to Apply Blush Across the Nose
The nose blush is what makes Igari makeup recognizable.
- Use what is left on your brush or sponge after blending the cheeks, so the amount is small.
- Sweep across the bridge of the nose from one side to the other.
- Keep the color light and diffuse. The nose should look flushed, not painted.
- If the nose area looks too strong, tap with a clean sponge or finger to soften it.
Igari Makeup for Different Skin Tones
Igari Makeup on Medium Skin Tones
Warm coral, peach-rose, and soft terracotta shades tend to look natural and glowing. Cream formulas blend easily and keep the look dewy.
Igari Makeup on Dark and Brown Skin
Choose deeper, more pigmented shades such as berry, plum-rose, deep coral, or brick. Build in thin layers and blend well so the color looks like a flush, not a mask. Cream blush is often easier to blend on deeper skin tones than powder.
Igari Makeup on Fair Skin
Soft pink and light peach work well. Use a very small amount, because pale skin shows pigment quickly.
Does Igari Makeup Suit All Face Shapes?
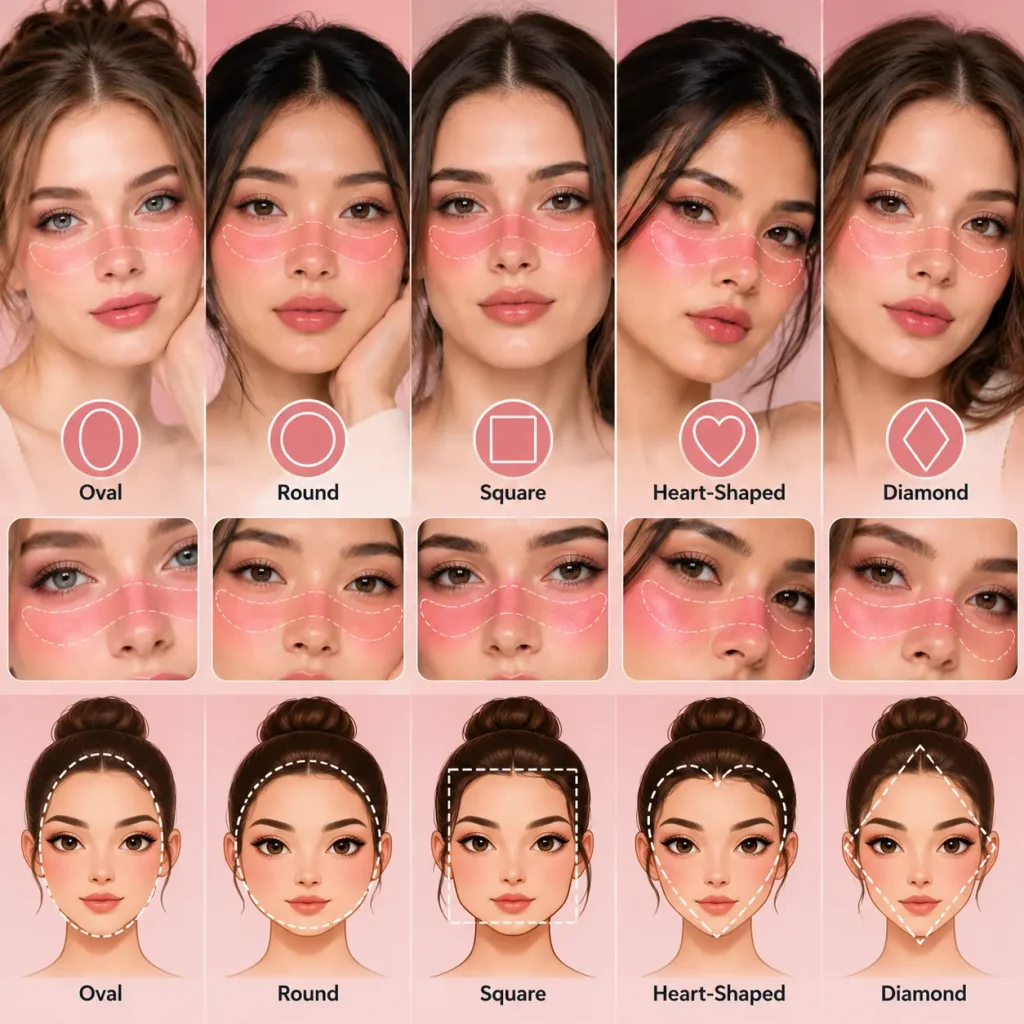
It can work on most face shapes, with small placement adjustments. Face shape guidance is a starting point, not a rule.
- Round face: place the blush slightly higher and blend it more toward the temples, rather than concentrating it at the center of the cheeks. Keep the nose sweep light.
- Oval face: most placements work, so you can follow the standard approach.
- Square face: softer, more diffused blush helps balance a strong jaw.
- Long face: a slightly wider horizontal placement can add balance.
- Heart-shaped face: keep the blush soft and avoid pulling it too high toward the temples.
Igari makeup for a round face works best when the blush stays blended and does not sit as one concentrated circle on the cheeks.
Igari Makeup for Different Occasions
Igari Makeup for Everyday
Use a sheer skin tint, a small amount of cream blush, mascara, and a tinted lip balm. It takes only a few minutes and looks fresh. For outfit ideas that match a soft everyday look, see our outfit ideas for every occasion.
Igari Makeup for Date Night
Build the blush a little more, add a soft shimmer on the lids, and finish with a glossy pink lip. This is also where a soft pink Igari blush look shines, since the flushed cheeks look romantic in warm light. For what to wear, check our date night outfit ideas.
Soft Pink Igari Blush Look
Choose a light pink cream blush, blend it under the eyes and across the nose, then tap a matching powder blush over the top. Keep the eyes minimal and add clear gloss on the lips.
Igari Makeup vs. Other Blush Techniques
What Is the Difference Between Igari and Draping Blush?
Igari blush sits lower, under the eyes and across the nose, for a flushed, youthful look. Draping blush is generally swept along the cheekbones toward the temples for a lifted, sculpted effect. The two can look different on the same face because the placement changes where the eye is drawn.
What About “Ryo” Makeup?
We could not find a reliable, widely documented makeup style called Ryo to compare with Igari, so we are not going to guess. If you saw the term in a specific video or article, check what that creator describes, and compare the blush placement to the descriptions above.
J-Beauty and K-Beauty Blush
Japanese and Korean blush looks share a soft, natural philosophy, but the placement differs. Igari places color close to the eyes and across the nose, while Korean-style blush is typically applied on or just below the cheekbone for a sweet, glowy look. Both styles favor sheer, blendable formulas and a fresh finish.
Tools and Products That Help
- Fingers: warm and effective for blending cream blush.
- Damp makeup sponge: gives a seamless, skin-like finish.
- Fluffy blush brush: diffuses powder blush softly.
- Small dense brush: helps with the nose area.
- Translucent powder and setting spray: help the look last.
We do not name specific products here because shade ranges and formulas change often. When you shop, read recent reviews, check shade ranges for your skin tone, and make sure the product is safe for use on the face.
Safety and Skin Comfort
Because Igari blush goes close to the eyes, a few precautions help.
- Keep product out of the eyes. Stay away from the lash line and check that the blush is formulated for the face.
- Do a patch test if you have sensitive skin or known allergies.
- Remove makeup before bed. Clean skin supports a healthy complexion.
- Do not share face makeup, since it can spread bacteria.
- Stop use if you notice irritation, and speak with a doctor or dermatologist if it continues.
For safety guidance on cosmetics, the U.S. Food and Drug Administration is a reliable source.
Common Igari Makeup Mistakes
- Using too much product at once. Build in thin layers so it stays soft.
- Placing blush too low or too high. Aim for under the eyes and across the nose, not on the jaw or at the hairline.
- Leaving hard edges. Blend until you cannot see where the color starts.
- Choosing a shade that is too pale or too dark for your skin. Test in natural light.
- Piling on contour and highlighter. The look relies on a soft flush, not heavy sculpting.
- Applying blush over dry or flaky skin. Prep your skin first.
- Skipping the nose. The nose sweep is what ties the look together.
Frequently Asked Questions
What is Igari makeup?
Igari makeup is a Japanese blush technique named after makeup artist Shinobu Igari. It places blush under the eyes and across the bridge of the nose for a flushed, youthful look, and it is sometimes called hangover makeup.
How do I apply Igari blush?
Apply a small amount of cream or liquid blush under the eyes and across the nose bridge, blend it outward toward the temples, and set with a powder blush in the same color family.
Where should I place blush for Igari makeup?
Place it just under the eyes, along the upper cheeks, and across the bridge of the nose. Keep the lowest edge above the tip of your nose and avoid placing it too low on the cheeks.
Does Igari makeup suit all face shapes?
It can work on most face shapes with small adjustments. Round faces often benefit from blending the color higher and toward the temples.
Should I use cream blush or powder blush for Igari makeup?
Cream or liquid blush gives the most natural flush, and a powder blush in the same shade helps set it. Powder alone works well for oily skin.
How do I make Igari makeup last all day?
Prep your skin, layer cream blush with a matching powder, set the T-zone with translucent powder, and use a setting spray. Carry the blush for touch-ups.
Does Igari makeup work on dark skin?
Yes. Choose deeper shades like berry, plum-rose, or brick, and build thin layers so the color looks like a natural flush.
Can I wear Igari makeup every day?
Yes. It is a light, minimal look that takes only a few minutes, and many people wear it daily. Just keep skin comfortable and remove makeup before bed.
Conclusion
Igari makeup is all about a soft, diffused flush placed under the eyes and across the nose. Prepare your skin, choose a shade and formula that suit you, place the blush carefully, blend until there are no edges, and keep the rest of your makeup minimal.
For your next step, try the look with one cream blush and your fingers on a day when you are not in a hurry. Start with a small amount, add more slowly, and adjust the placement until it flatters your face.